

The maps on this page are to be used as guides.
If you would like the full description of these Safe Areas, including the coordinates, read the Legislation website.
Auckland Medical Aid Centre
Map
View full size image of Auckland Medical Aid Centre Safe Area (JPG, 1.7MB)
View interactive map for Auckland Medical Aid Centre safe area
Description
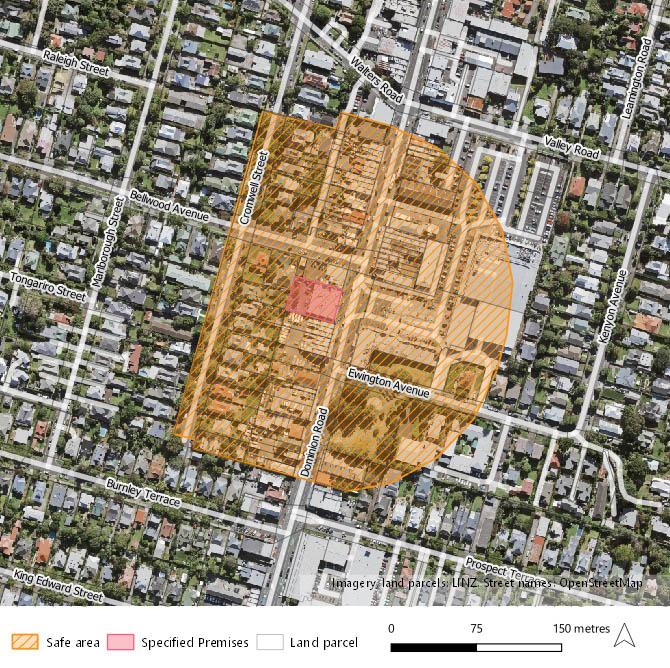
The Auckland Medical Aid Centre safe area is the area enclosed by a line that:
- begins at the unnamed service road between Cromwell Street and Dominion Road, then
- proceeds clockwise along a curved line following a 150m radius from the boundary of the Auckland Medical Aid Centre land parcels to 336 Dominion Road, then
- proceeds in a north-westerly direction to 50 Cromwell Street, then
- proceeds in a north-easterly direction to 48 Cromwell Street, then
- proceeds in a north-westerly direction to 57 Cromwell Street, then
- proceeds in a north-easterly direction to 23 Cromwell Street, then
- proceeds in a south-easterly direction to the unnamed service road between Cromwell Street and Dominion Road, then
- proceeds to the point described in 1.
Epsom Day Unit (Greenlane Clinical Centre)
Map
View full size image of Epsom Day Unit (Greenlane Clinical Centre) Safe Area (JPG, 2MB)
View interactive map for Epsom Day Unit (Greenlane Clinical Centre) Safe Area
Description
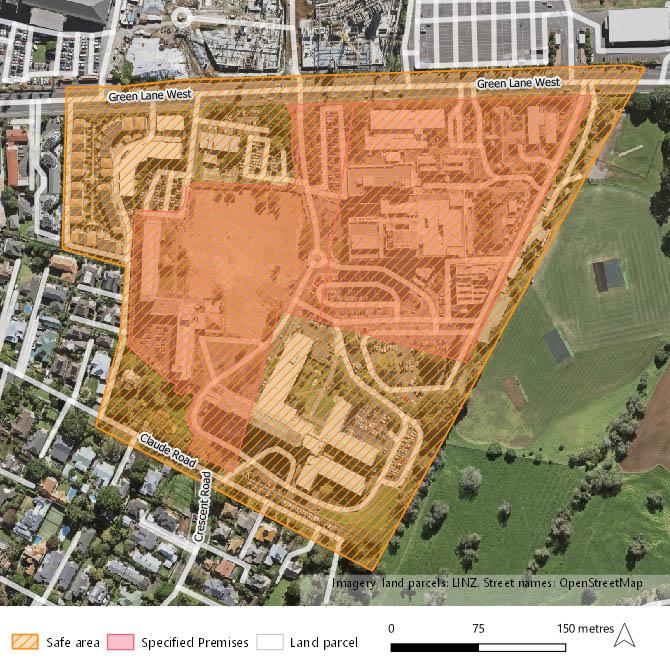
The Epsom Day Unit (Greenlane Clinical Centre) safe area is the area enclosed by a line that:
- begins at Green Lane West, then
- proceeds in a south-westerly direction to Cornwall Park, then
- proceeds in a north-westerly direction to 24 Claude Road, then
- proceeds in a northerly direction along the driveway between 24 and 26 Claude Road to 218 Green Lane West, then
- proceeds in a north-westerly direction to the driveway between 218 and 222 Green Lane West, then
- proceeds in a northerly direction to Green Lane West, then
- proceeds in an easterly direction along the northern edge of the footpath of Green Lane West to the point described in 1.
Waikato Hospital
Map
View full size image of Waikato Hospital Safe Area (JPG, 1.8MB)
View interactive map Waikato Hospital Safe Area
Description
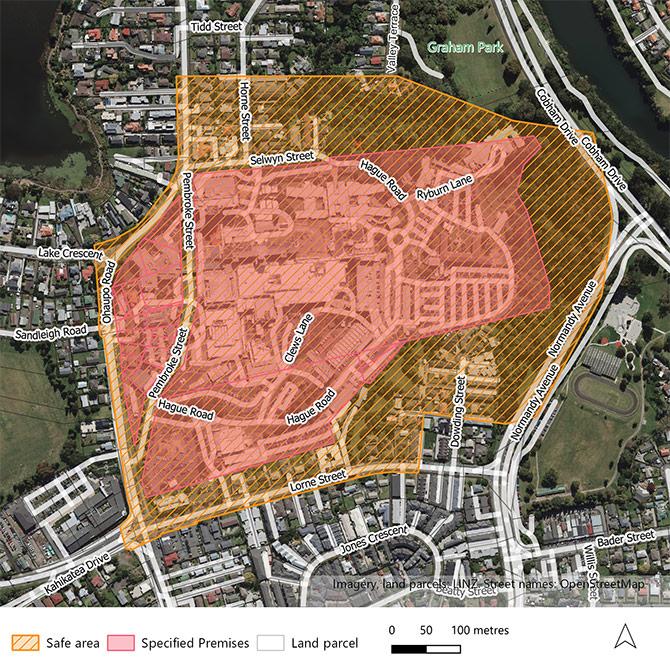
The Waikato Hospital safe area is the area enclosed by a line that:
- begins at Normandy Avenue, then
- proceeds in a westerly direction to 3A Dowding Street, then
- proceeds in a southerly direction to Lorne Street, then
- proceeds in a generally westerly direction along the southern side of Lorne Street to the intersection of Kahikatea Drive and Ohaupo Road, then
- proceeds in a generally northerly direction along the western side of Ohaupo Road to the intersection of Lake Crescent and Ohaupo Road, then
- proceeds in a generally north-easterly direction along Lake Crescent to the intersection of Lake Crescent and Pembroke Street, then
- proceeds in a northerly direction to 162A Pembroke Street, then
- proceeds in an easterly direction to 20 Valley Terrace, then
- proceeds in a south-easterly direction to Graham Park, then
- proceeds in an easterly direction to Cobham Drive, then
- proceeds in a generally south-westerly direction along Cobham Drive onto Normandy Avenue, then
- proceeds in a westerly direction to the point described in 1.
Thames Hospital
Map
View full size image of the Thames Hospital Safe Area (JPG, 1.9MB)
View interactive map for the Thames Hospital Safe Area
Description
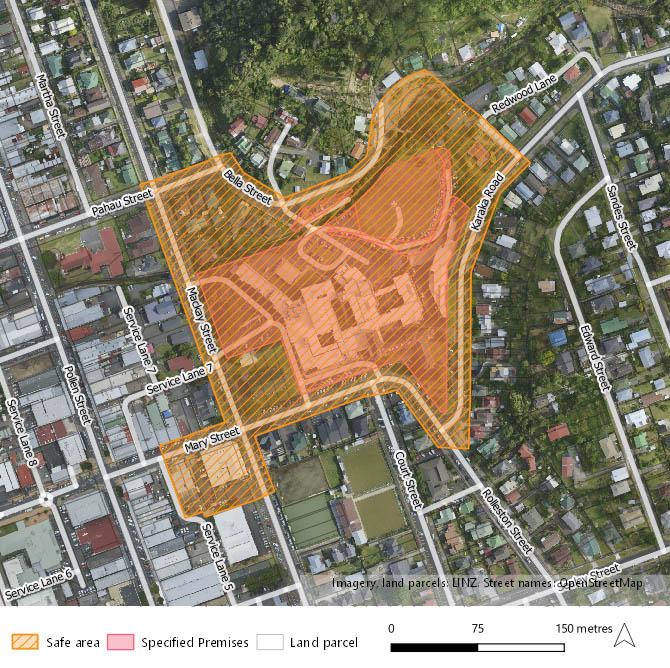
The Thames Hospital safe area is the area enclosed by a line that:
- commences at 130 Bella Street, then
- proceeds in a generally easterly direction along the northern side of Bella Street to the end of Bella Street, then
- proceeds in a south-easterly direction to 100 Redwood Lane, then
- proceeds in a south-easterly direction to the intersection of Redwood Lane and Karaka Road, then
- proceeds in a generally south-westerly direction along the south-eastern side of Karaka Road to the intersection of Karaka Road and Rolleston Street, then
- proceeds in a westerly direction to 819 Rolleston Street, then
- proceeds in a north-westerly direction to where Rolleston Street becomes Mary Street, then
- proceeds in a south-westerly direction to the intersection of Mary Street and Mackay Street, then
- proceeds in a south-easterly direction to 515 Mackay Street, then
- proceeds in a south-westerly direction to Service Lane 5, then
- proceeds in a generally northerly direction along the eastern side of Service Lane 5 to the intersection of Service Lane 5 and Mary Street, then
- proceeds in a north-easterly direction to the intersection of Mary Street and Mackay Street, then
- proceeds in a north-westerly direction to the intersection of Mackay Street and Pahau Street, then proceeds to the point described in 1.
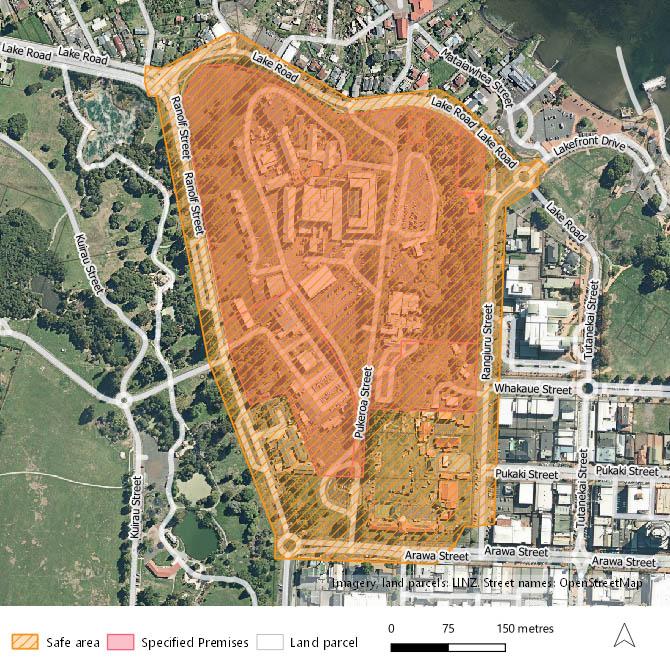
Rotorua Hospital - Te Aka Tauawhi Tangata—Women’s Clinic
Map
View interactive map for Te Aka Tauawhi Tangata—Women’s Clinic (Rotorua Hospital) Safe Area
Description
The Te Aka Tauawhi Tangata—Women’s Clinic (Rotorua Hospital) safe area is the area enclosed by a line that:
- commences at the intersection of Lake Road and Ranolf Street, then
- proceeds in a generally south-easterly direction along the northern side of Lake Road to the intersection of Lake Road, Mataiawhea Street and Rangiuru Street, then
- proceeds in a north-easterly direction to the intersection of Mataiawhea Street and Lakefront Drive, then
- proceeds in a south-easterly direction to War Memorial Park, then
- proceeds in a south-westerly direction to War Memorial Park, then
- proceeds in a southerly direction to War Memorial Park, then
- proceeds in a generally southerly direction along the eastern side of Rangiuru Street to 1146 Rangiuru Street, then
- proceeds in a westerly direction to 1249 Arawa Street, then
- proceeds in a south-westerly direction to Arawa Street, then
- proceeds in a south-westerly direction to 1232 Arawa Street, then
- proceeds in a westerly direction along the southern side of Arawa Street to the intersection of Arawa Street and Ranolf Street, then
- proceeds in a northerly direction to Kuirau Park, then
- proceeds in a north-westerly direction to Kuirau Park, then
- proceeds in a north-westerly direction to Kuirau Park, then
- proceeds in a westerly direction to Kuirau Park, then
- proceeds in a northerly direction to Lake Road, then
- proceeds to the point described in 1.
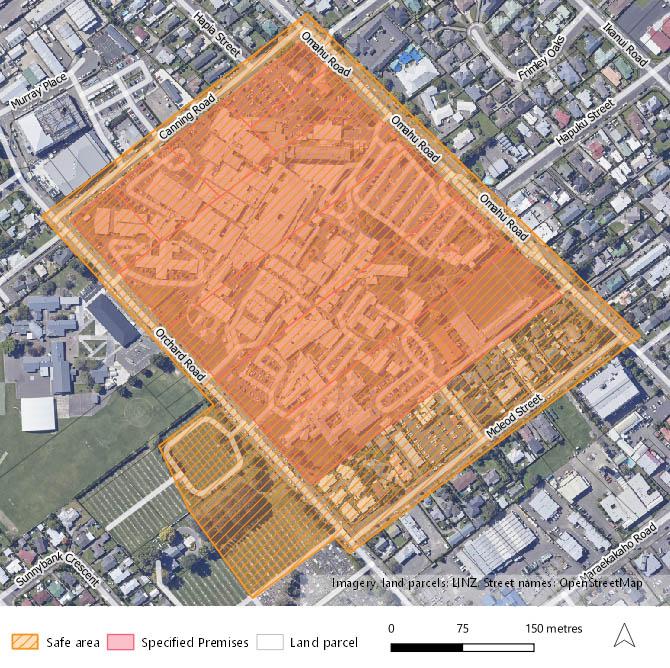
Hawke’s Bay Hospital - The Terrace Clinic
Map
View full size image of the Terrace Clinic (Hawke’s Bay Hospital) Safe Area (JPG, 1.9MB)
View interactive map for the Terrace Clinic (Hawke’s Bay Hospital) Safe Area
Description
The Terrace Clinic (Hawke’s Bay Hospital) safe area is the area enclosed by a line that:
- Commences at Omahu Road, then
- proceeds in a south-westerly direction to Orchard Road, then
- proceeds in a north-westerly direction to Orchard Road, then
- proceeds in a south-westerly direction to Hastings Cemetery, then
- proceeds in a north-westerly direction to Hastings Cemetery, then
- proceeds in a north-easterly direction to Orchard Road, then
- proceeds in a north-westerly direction to the intersection of Orchard Road and Canning Road, then
- proceeds in a north-easterly direction to the intersection of Canning Road and Omahu Road, then
- proceeds in a south-easterly direction to the point described in 1.
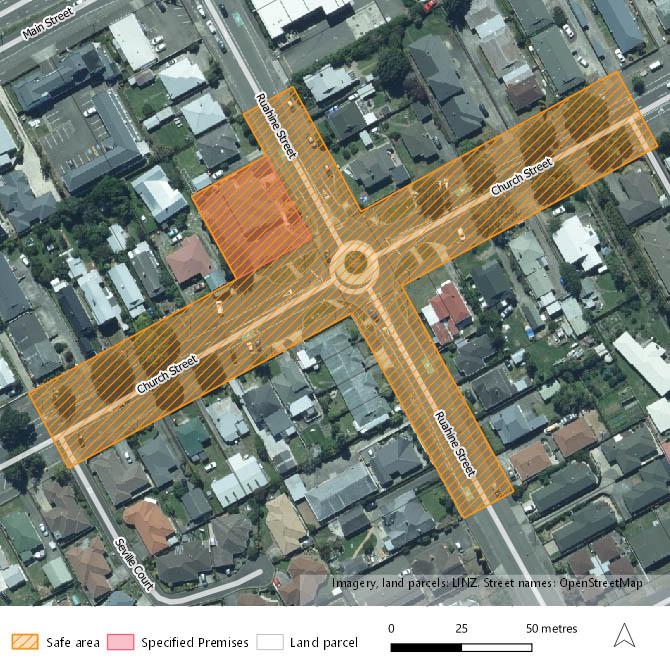
Palmerston North - The Women’s Clinic
Map
View full size image of the Women’s Clinic, Palmerston North Safe Area (JPG, 1.7MB)
View interactive map for the Women’s Clinic, Palmerston North Safe Area
Description
The Women’s Clinic, Palmerston North safe area is the area enclosed by a line that:
- commences at 262 Ruahine Street, then
- proceeds in a north-westerly direction to 260 Ruahine Street, then
- proceeds in a north-easterly direction to 263 Ruahine Street, then
- proceeds in a south-easterly direction to the intersection of Ruahine Street and Church Street, then
- proceeds in a north-easterly direction to 611 Church Street, then
- proceeds in a south-easterly direction to the intersection of Church Street and McKenzie Court, then
- proceeds in a south-westerly direction to the intersection of Church Street and Ruahine Street, then
- proceeds in a south-easterly direction to 281 Ruahine Street, then
- proceeds in a south-westerly direction to 278 Ruahine Street, then
- proceeds in a north-westerly direction to the intersection of Ruahine Street and Church Street, then
- proceeds in a south-westerly direction to the intersection of Church Street and Seville Court, then
- proceeds in a north-westerly direction to 571 Church Street, then
- proceeds in a north-easterly direction to 589 Church Street, then
- proceeds in a north-westerly direction to 591 Church Street, then
- proceeds to the point described in 1.
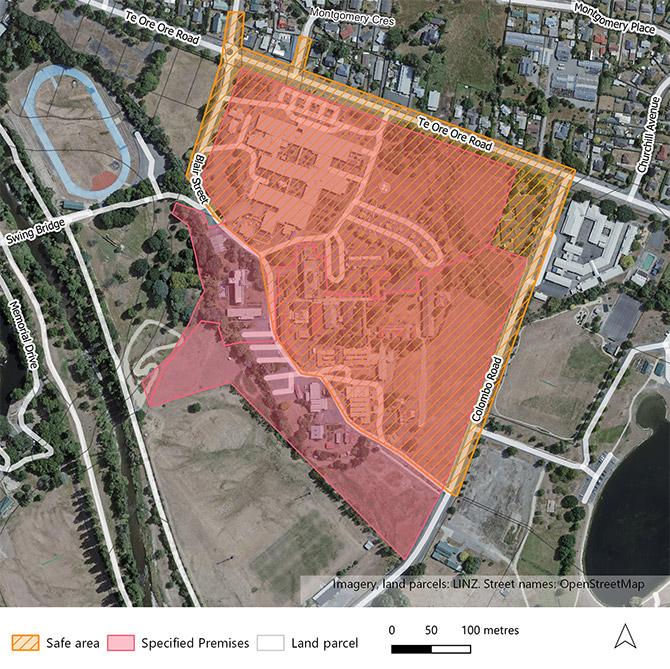
Wairarapa Hospital
Map
View full size image of Wairarapa Hospital Safe Area (JPG, 1.6MB)
View interactive map Wairarapa Hospital Safe Area
Description
The Wairarapa Hospital safe area is the area enclosed by a line that:
- begins at 96 Blair Street, then
- proceeds in a northerly direction to the intersection of Blair Street and Te
Ore Ore Road, then - proceeds in a northerly direction to 1C Totara Street, then
- proceeds in an easterly direction to 2 Totara Street, then
- proceeds in a southerly direction along the eastern side from 4 Totara
Street to the intersection of Totara Street and Te Ore Ore Road, then - proceeds in an easterly direction along the northern side of Te Ore Ore
Road to the intersection of Te Ore Ore Road and Montgomery Crescent, then - proceeds in a northerly direction to 78 Montgomery Crescent, then
- proceeds in an easterly direction to 57 Montgomery Crescent, then
- proceeds in a southerly direction to the intersection of Te Ore Ore Road
and Montgomery Crescent, then - proceeds in an easterly direction along the northern side of Te Ore Ore
Road to the intersection of Te Ore Ore Road and Colombo Road, then - proceeds in a southerly direction along the eastern side of Colombo
Road to the intersection of Blair Street and Colombo Road, then - proceeds in a generally north-westerly direction along the western side
of Blair Street to the point described in paragraph 1.
Hutt Hospital
Map
View full size image of Hutt Hospital Safe Area (JPG, 1.8MB)
View interactive map Hutt Hospital Safe Area
Description
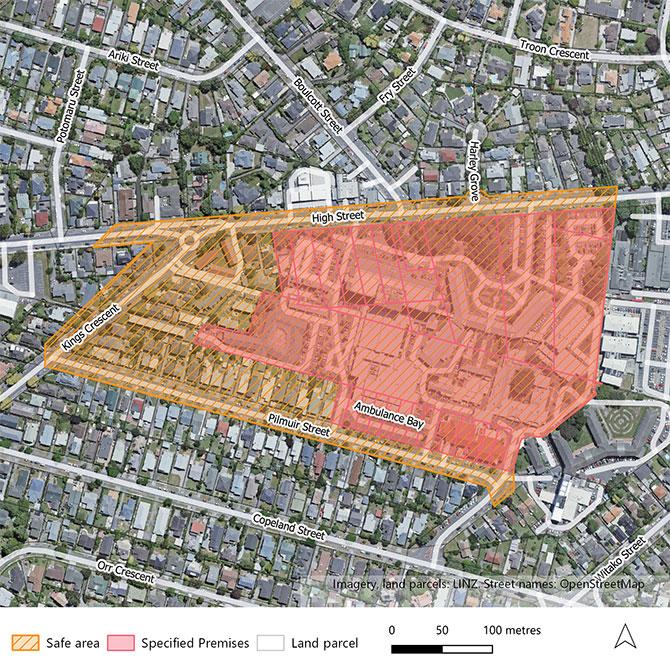
The Hutt Hospital safe area is the area enclosed by a line that:
- begins at 64 Pilmuir Street, then
- proceeds in a westerly direction to the intersection of Kings Crescent and Pilmuir Street, then
- proceeds in a northerly direction to 141 Kings Crescent, then
- proceeds in a north-easterly direction along the western side of Kings Crescent to 153 Kings Crescent, then
- proceeds in a westerly direction to 600 High Street, then
- proceeds in a north-easterly direction to 625 High Street, then
- proceeds in an easterly direction along the northern side of High Street to the intersection of High Street and Harley Grove, then
- proceeds in a north-easterly direction to 1 Harley Grove, then
- proceeds in an easterly direction to 15 Harley Grove, then
- proceeds in a south-easterly direction to the intersection of Harley Grove and High Street, then
- proceeds in an easterly direction to 703 High Street, then
- proceeds in a generally southerly direction along the Hutt Hospital premises perimeter to Pilmuir Street, then
- proceeds in a southerly direction to 71 Pilmuir Street, then
- proceeds in a south-westerly direction to 73 Pilmuir Street, then
- proceeds in a northerly direction to the point described in paragraph 1.
Wellington Regional Hospital - Te Mahoe Unit
Map
View full size image of The Te Mahoe Unit (Wellington Regional Hospital) Safe Area (JPG, 1.8MB)
View interactive map for The Te Mahoe Unit (Wellington Regional Hospital) Safe Area
Description
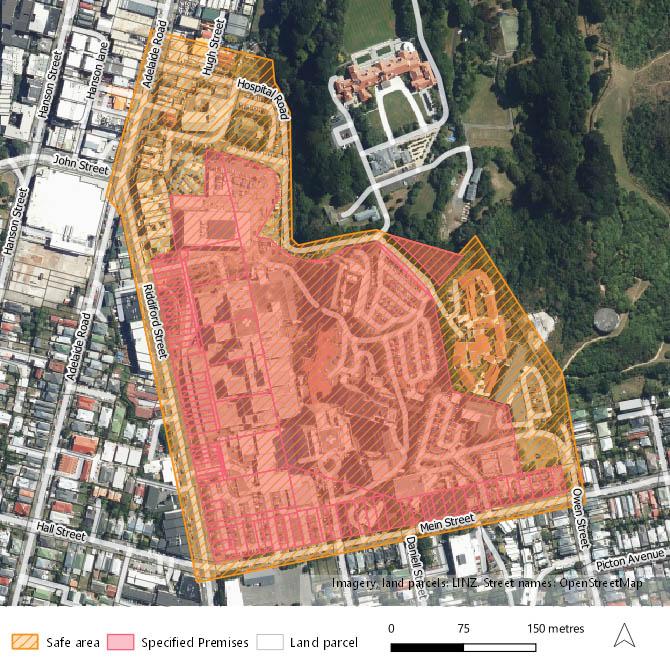
The Te Mahoe Unit (Wellington Regional Hospital) safe area is the area enclosed by a line that:
- begins at the intersection of Mein Street and Owen Street, then
- proceeds in a westerly direction to the intersection of Mein Street, Riddiford Street, and Hall Street, then
- proceeds in a north-westerly direction to the intersection of Riddiford Street, John Street, and Adelaide Road, then
- proceeds in a north-easterly direction to 136 Adelaide Road, then
- proceeds in a south-easterly direction to Hospital Road, then
- proceeds following the eastern side of Hospital Road to Hospital Road, then
- proceeds in a north-easterly direction to the unnamed service road entrance to Government House, then
- proceeds in a south-easterly direction to Vice Regal Park, then
- proceeds in a north-easterly direction to Vice Regal Park, then
- proceeds in a south-easterly direction to a pedestrian way in Vice Regal
- proceeds in a south-easterly direction to a pedestrian way in Vice Regal Park, then
- proceeds to the point described in 1.
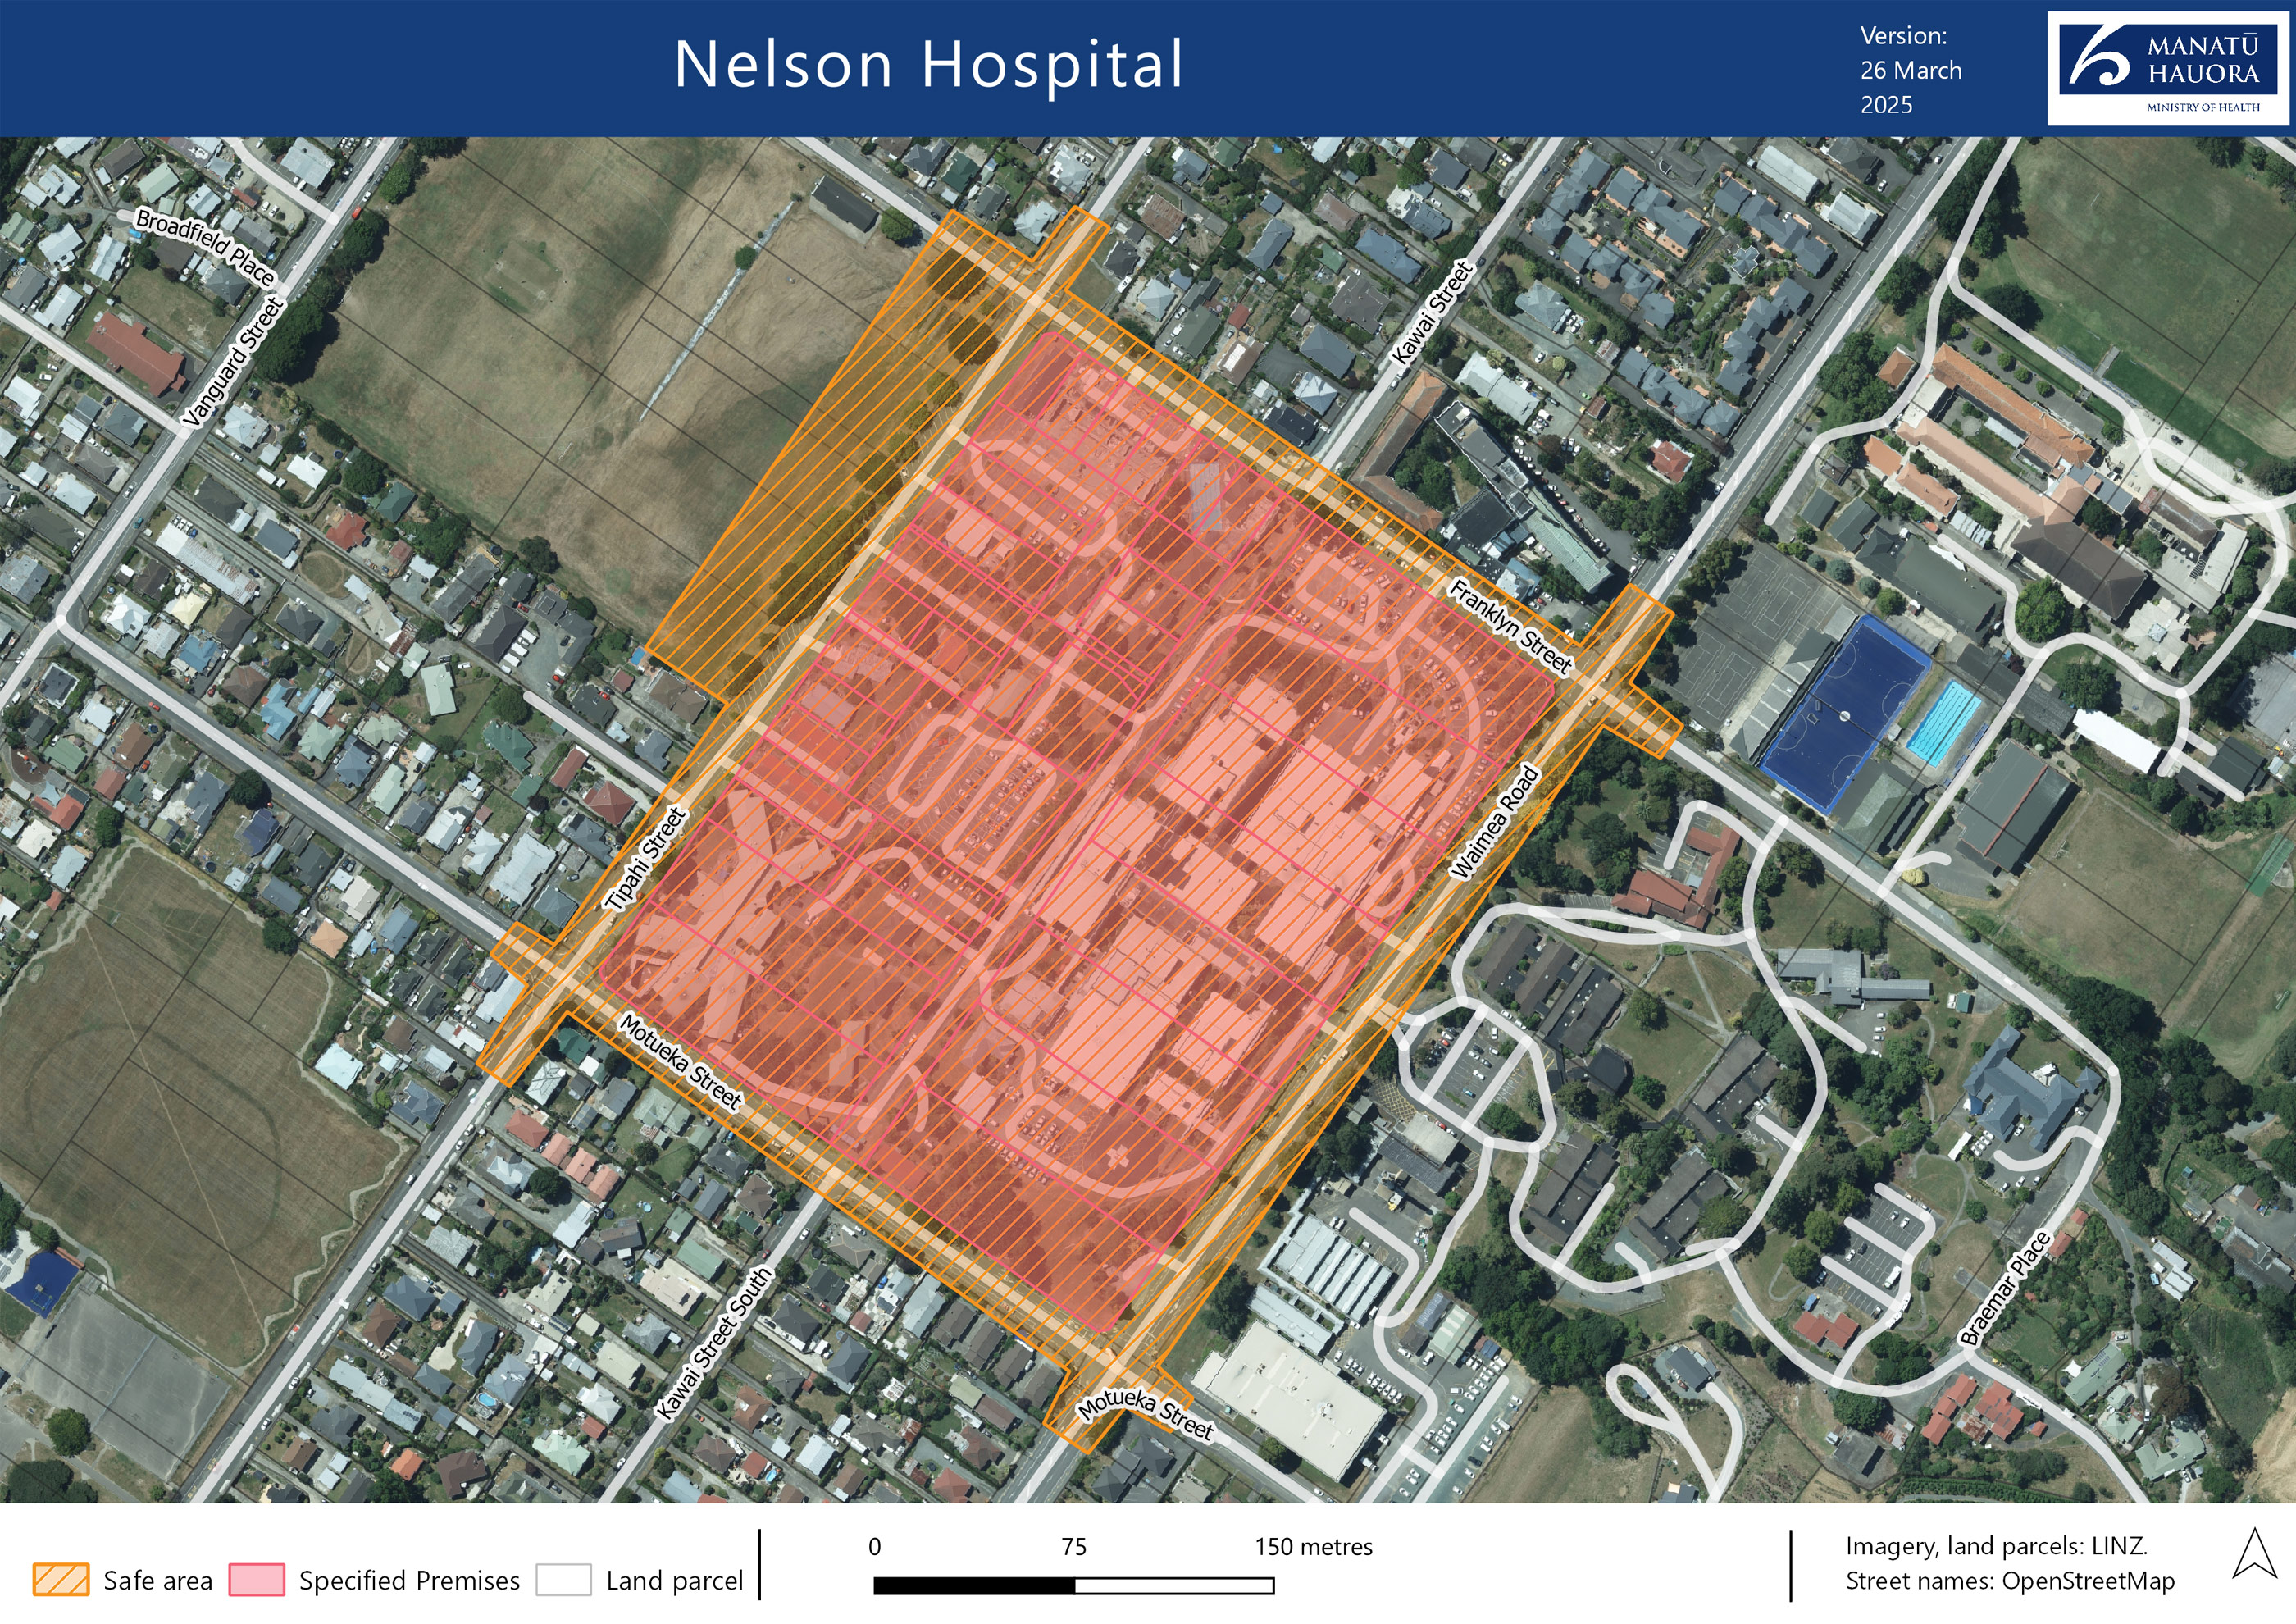
Nelson Hospital
Map
View full size image of Nelson Hospital Safe Area (JPG, 1.8MB)
View interactive map Nelson Hospital Safe Area
Description
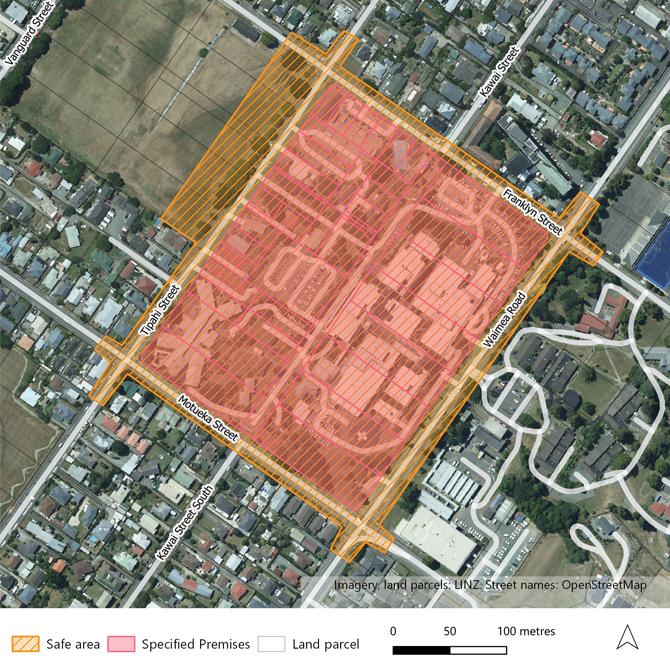
The Nelson Hospital safe area is the area enclosed by a line that:
- begins at the intersection at Motueka Street and Waimea Road, then
- proceeds in a north-westerly direction to the intersection of Motueka Street and Tipahi Street, then
- proceeds in a south-westerly direction to 79 Tipahi Street, then
- proceeds in a north-westerly direction to 80 Tipahi Street, then
- proceeds in a north-easterly direction to the intersection of Motueka Street and Tipahi Street, then
- proceeds in a north-westerly direction to 30 Motueka Street, then
- proceeds in a north-easterly direction to 72 Tipahi Street, then
- proceeds in a south-easterly direction to the intersection of Motueka Street and Tipahi Street, then
- proceeds in a north-easterly direction to the southern corner of Broads playing fields, then
- proceeds in a north-westerly direction along Broads playing fields to 62A Tipahi Street, then
- proceeds in a north-easterly direction across Broads playing fields to 25 Franklyn Street, then
- proceeds in a south-easterly direction to the intersection of Franklyn Street and Tipahi Street, then
- proceeds in a north-easterly direction to 38 Tipahi Street, then
- proceeds in a south-easterly direction to 31 Franklyn Street, then
- proceeds in a south-westerly direction to the intersection of Franklyn Street and Tipahi Street, then
- proceeds in a south-easterly direction to the intersection of Franklyn Street and Waimea Road, then
- proceeds in a north-easterly direction to 96 Waimea Road, then
- proceeds in a south-easterly direction across Waimea Road to 60 Franklyn Street, then
- proceeds in a south-westerly direction to the intersection of Franklyn Street and Waimea Road, then
- proceeds in a south-easterly direction along the north-eastern side of Franklyn Street to 60 Franklyn Street, then
- proceeds in a south-westerly direction across Franklyn Street to 60 Franklyn Street; then
- proceeds in a north-westerly direction to the intersection of Franklyn Street and Waimea Road, then
- proceeds in a south-westerly direction to the intersection of Motueka Street and Waimea Road, then
- proceeds in a south-easterly direction to 66 Motueka Street, then
- proceeds in a south-westerly direction to 105 Waimea Road, then
- proceeds in a north-westerly direction to the intersection of Motueka Street and Waimea Road, then
- proceeds in a south-westerly direction to 107 Waimea Road, then
- proceeds in a north-westerly direction to 58 Motueka Street, then
- proceeds in a north-easterly direction to the point described in paragraph 1.
Greymouth Hospital - Te Nīkau, Grey Hospital and Health Centre
Map
Description
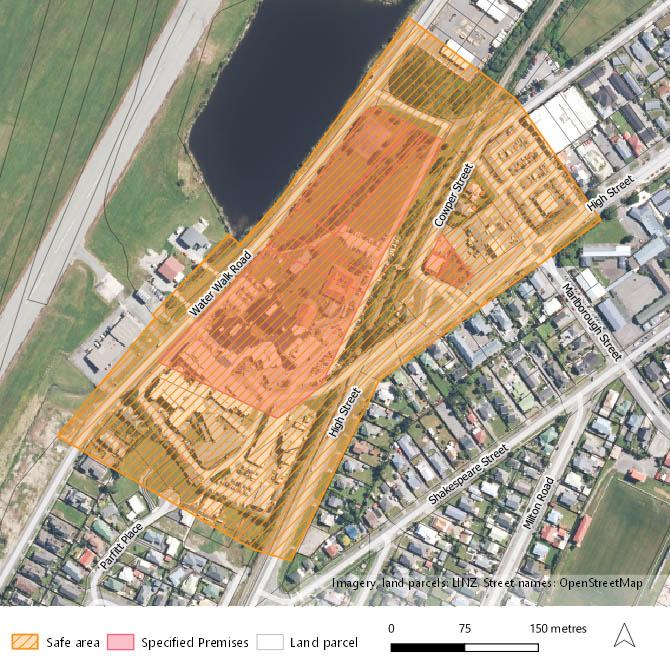
The Te Nīkau, Grey Hospital and Health Centre (Greymouth Hospital) safe area is the area enclosed by a line that:
- begins at Water Walk Road at the unnamed tidal lake, then
- proceeds in a south-easterly direction to Cowper Street, then
- proceeds in a south-easterly direction to High Street at Greymouth High School, then
- proceeds in a south-westerly direction to 149 High Street, then
- proceeds in a south-westerly direction to High Street behind 165 Shakespeare Street, then
- proceeds in a north-westerly direction to 18 Tasman Street, then
- proceeds in a north-westerly direction to Water Walk Road, then
- proceeds in a north-easterly direction to Water Walk Road, then
- proceeds in a north-westerly direction to Water Walk Road, then
- proceeds in a north-easterly direction to Water Walk Road, then
- proceeds in a south-easterly direction along the south-western side of the unnamed tidal lake to the unnamed tidal lake, then
- proceeds along the south-eastern side of the unnamed tidal lake to the point described in 1.
Christchurch Hospital - Gynaecology Procedure Unit and Christchurch Women’s Hospital
Map

View interactive map for The Gynaecology Procedure Unit and Christchurch Women’s Hospital Safe Area
Description
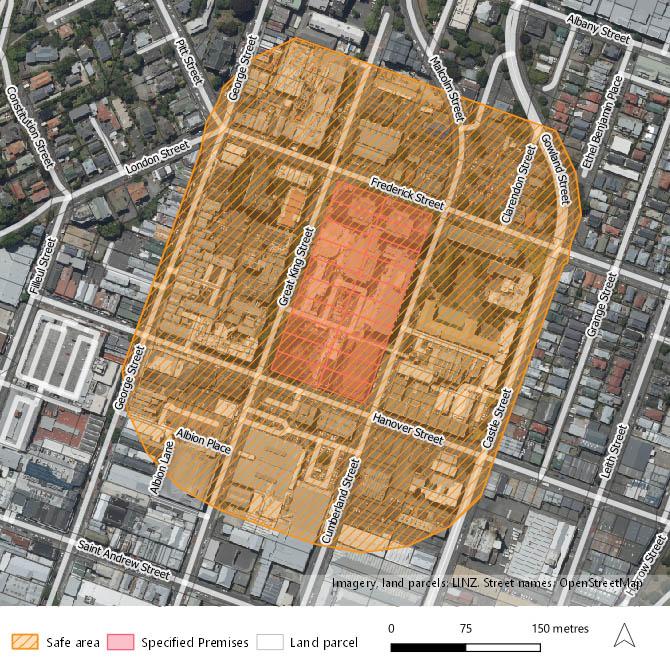
The Gynaecology Procedure Unit and Christchurch Women’s Hospital (Christchurch Hospital) safe area is the area enclosed by a line that:
- begins at 14 Oxford Terrace, then
- proceeds in a southerly direction to Tuam Street, then
- proceeds in a westerly direction to the intersection of Tuam Street and Antigua Street, then
- proceeds in a southerly direction to 258 Antigua Street, then
- proceeds in a westerly direction to 239 Antigua Street, then
- proceeds in a northerly direction to the intersection of Antigua Street and Riccarton Avenue, then
- proceeds in a north-westerly direction to the intersection of Riccarton Avenue and Hagley Avenue, then
- proceeds in a south-westerly direction to 550 Hagley Avenue, then
- proceeds in a north-westerly direction to Hagley Park, then
- proceeds in a north-easterly direction to Hagley Park south of the pedestrian and cycle way parallel to Riccarton Avenue, then
- proceeds in a north-westerly direction to Addington Brook, then
- proceeds in a north-easterly direction to Addington Brook, then
- proceeds in a south-easterly direction to the pedestrian way, then
- proceeds in a generally north-westerly direction along the pedestrian way to the north-west of Addington Brook, then
- proceeds in a north-easterly direction to the Christchurch Botanic Gardens, then
- proceeds in a north-easterly direction to the Christchurch Botanic Gardens, then
- proceeds in an easterly direction to the Christchurch Botanic Gardens, then
- proceeds in a south-easterly direction to the Christchurch Botanic Gardens, then
- proceeds in an easterly direction to 26 Rolleston Avenue, then
- proceeds in a southerly direction to Rolleston Avenue, then
- proceeds in a south-easterly direction to Cambridge Terrace, then
- proceeds in a southerly direction to Oxford Terrace, then
- proceeds to the point described in 1.
Dunedin Hospital
Map
View full size image of the Dunedin Hospital Safe Area (JPG, 1.9MB)
View interactive map for the Dunedin Hospital Safe Area
Description
The Dunedin Hospital safe area is the area enclosed by a line that:
- begins at the intersection of Gowland Street and Clarendon Street, then
- proceeds in a generally southerly direction following the eastern side of the footpath to 205 Castle Street, then
- proceeds along a curved line following a 150 m radius from the boundary of the Dunedin Hospital land parcels to George Street, then
- proceeds in a north-easterly direction to 449 George Street, then
- proceeds in a north-easterly direction along a curved line following a 150m radius from the boundary of the Dunedin Hospital land parcels to 452 George Street, then
- proceeds to the point described in 1.
Invercargill - The Women’s Clinic
Map
View full size image of the Women’s Clinic, Invercargill Safe Area (JPG, 1.8MB)
View interactive map for the Women’s Clinic, Invercargill Safe Area
Description
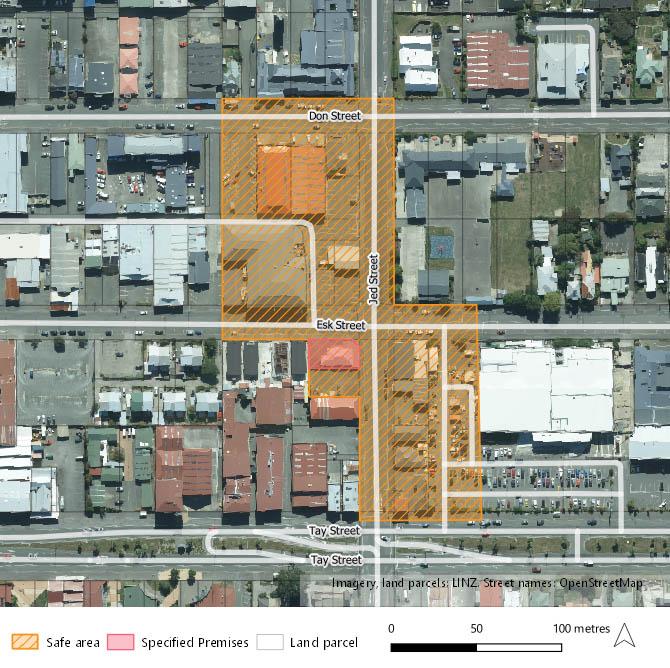
The Women’s Clinic, Invercargill safe area is the area enclosed by a line that:
- commences at Don Street, then
- proceeds in an easterly direction to the intersection of Don Street and Jed Street, then
- proceeds in a southerly direction to Esk Street, then
- proceeds in an easterly direction to Esk Street, then
- proceeds in a southerly direction to Tay Street, then
- proceeds in a westerly direction to the intersection of Tay Street and Jed Street, then
- proceeds in a northerly direction to 12 Jed Street, then
- proceeds in a westerly direction to 12 Jed Street, then
- proceeds in a northerly direction to Esk Street, then
- proceeds in a westerly direction to Esk Street, then
- proceeds to the point described in 1.
View image of the Women’s Clinic, Invercargill safe area map (JPG, 1.8MB)